 | 100% GROWN & SPUN IN AMERICA
Knitting Tips
Knitting with lace yarn
Here are some pointers to successfully knit with lace yarn:
If you are knitting a loose shawl (with large needles or a in pattern that’s very lacy and open), begin a new skein by tying the two ends together (using a square knot, see illustration below) instead of darning in ends later. Darning will be too visible on loosely knit lace garments and shawls and scarves should look attractive from both sides. If possible, begin new skein of yarn at beginning or end of row and thread in ends along edge of piece.

Cast on and bind off loosely. You should be ably to stretch cast-on and bind-off to width of knit item (in other words: bind-off or cast-on should not be the tightest area on shawl or scarf). If necessary, use larger needles for cast-on and bind-off.
Wood and bamboo needles are less slippery than aluminum or plastic ones. Stitches will be less likely to slide off by accident.
For lace knitting, some knitters prefer straight needles over circular needles. On a circular needle, stitches move off short shaft onto plastic loop as you are knitting, and with finer yarn they don’t always easily or automatically move back onto the shaft when you turn and begin knitting new row. With very fine lace yarn, stitches can catch at the base of the shaft if the shafts aren’t well-made. If that’s the case, you may find yourself threading stitches onto the shaft of the circular needle every few stitches. That can be annoying and it interrupts the flow of knitting. If this happens, check out premium circular needles.
If working with several skeins of hand painted variegated lace yarn, check > Knitting with variegated yarn.
Morehouse Merino Lace Yarn consists of a single strand of pencil roving twisted around itself in one direction. So there is a slight bias in the yarn that may become noticeable if you are using small needles (#0 to #2) and are knitting a relatively tightly knit garment. Washing and blocking the garment will help to correct it.
Most lace knitting, especially loosely knit shawls and scarves, looks limp and unattractive before blocking. To show off the pattern clearly, the garment needs to be stretched out and blocked properly. See below on how to block lace knitting.
Blocking Lace Shawls and Scarves
Please note: the following washing recommendations apply to Morehouse Merino Lace Yarn. For shawls, scarves and lace creations made with otheryarns, refer to the yarn manufacturer’s washing and care instructions.
Soak your lace creation in warm water, add mild soap (at Morehouse Farm, we use Palmolive(R) Dishwashing Liquid). Let it soak for a few minutes. Then rinse in same temperature water as washing water. Squeeze out as much water as possible (you can use a towel for this one: wrap shawl or scarf in towel and squeeze—don’t wring—towel to remove as much water as possible from knitting).
Unwrap shawl or scarf from towel. Now lay it flat on a large surface. Most shawls are about 80” long, about the length of a bed. So a bed might be the ideal place to use for blocking a large shawl. Cover bedspread with a sheet to create a smooth surface (don’t worry about getting the bed wet: thin lace yarn absorbs very little water and after squeezing most water out of it, the shawl or scarf is damp, no longer wet).
Now stretch out scarf or shawl to final width and length. This process takes a little patience, since the knitting wants to return to its un-stretched condition. Just keep stretching it until it remains in place. We don’t use pins to block shawls. We find the process of pinning too tedious and we don’t like the scalloped edge it sometimes creates (especially if you are not using dozens of pins). For triangular shawls, use corner of bed for tip of shawl and stretch tips along side and bottom edge of bed. Sometimes it helps to keep shawl in place by stretching it slightly over edge of bed. Let it dry.
Designing your own lace shawls
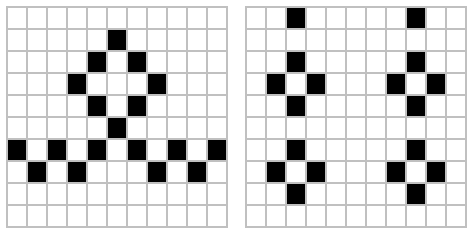
It’s very easy. The simple eyelet or lace patterns in a shawl are worked as a yarn-overs followed or preceded by knit 2 together (so the number of stitches will always remain the same). To create or design your own pattern, use a piece of graph paper. Draw in your eyelet pattern by filling in the squares (see illustrations below). The filled in squares will be your yarn-overs. You can make it a very simple pattern by repeating a simple motif every 10 or so stitches and every few rows, or you can make it very complex with every row a different design and with very few repeats.
You’ll need a piece of graph paper that has as many squares as you plan to have stitches and as many rows as you need for your design.
> FREE GRAPH PAPER
To figure out number of stitches for your shawl, knit a swatch using the needle size you plan to use and knit with a simple lace design (yarn-overs followed by knit 2 together). Wash swatch, stretch and block to dry. Then count stitches per inch on swatch, multiply by inches of desired width of shawl. For example, if your gauge is 4 stitches per inch and you want the shawl to be 24” wide, your number of stitches will be 4×24=96 stitches. Add a couple of edge stitches at beginning and end of row so design does not run all the way to the edge of shawl (a little like framing your design).
When you are ready to knit your design, work it as follows: for uneven numbered rows follow your pattern on graph paper (blank squares are knit, filled in squares are yarn-overs followed by knit 2 together—which will count as your next blank square), even numbered rows are knit without yarn-overs (or purled, if you work your shawl in Stockinette stitch). The design on your graph paper represents uneven rows only.
The eyelet design on your shawl could be a horizontal design (check our > Contessa Shawl), or you can have a vertical design, repeated every few stitches, but running the entire length of your shawl (check our > LaScala Shawl). Be creative!
If you have more questions, contact us at
> KnitTips@MorehouseFarm.com